Generally you can tell you are using a Swing component if it starts with a "J". For instance in the first part of this resource we used Buttons in a number of places. A Swing button is called JButton.
import javax.swing.*;
public class TestFrame
{
   public static void main(String[] args)
   {
      JFrame jf = new JFrame("The title for the JFrame");
      jf.setSize(250,100);
      jf.setVisible(true);
   }
} |
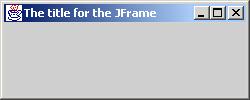
and you'll get a nice window that looks like this:
We haven't put anything in it so it looks kind of empty. If you've actually got the application running try clicking on the "X" in the top-right corner. You'll notice the window disappears as you'd expect. However the window is only hiding. The application is still running. We can solve that problem either by adding the statement jf.setDefaultCloseOperation(DISPOSE_ON_CLOSE); or by adding a window listener to do that. Then closing the window will cause the JFrame to stop running instead of just hiding (the default default closing action). But suppose you don't want to always have to do all that setup. Suppose you don't want the window to just close and end the program without first confirming with the user. This sounds like a job for inheritance.
We'll make our own custom JFrame called MyJFrame. We'll give it a standard size of 400 x 400. We'll prompt the user with a dialog box that says "Do you really want to quit" if they try to close the window to make sure it wasn't an accident. They get a button for "yes" and a button for "no". If they confirm we'll exit the application, if not we'll leave things alone. Here's the code:
If the you click the "X" you'll see this:

An Aside |
JOptionPane is a very useful class. It basically provides some ready made
dialog boxes you can use in your programs. There are a vast number of different
options for using this. We'll only look at two. First how we used it in MyJFrame:
int choice = JOptionPane.showConfirmDialog (MyJFrame.this,
                         "Do you really want to quit" ,
                         "Confirm quit" , JOptionPane.YES_NO_OPTION);
This version has four paramters. They are:
Another handy to use version of JOptionPane provides a nice way of reading a String. String entry = JOptionPane.showInputDialog("What is your name?");
If they click "OK" or press enter after typing then entry will be the String they
entered. WARNING: If they click "Cancel" or close the dialog box then entry will be
null. Here's what you'll see:
|
Now if we want to use MyFrame there is not as much work to do. In an application if you want one you just need two lines:
MyJFrame mjf = new MyJFrame("The Title");
mjf.setVisible(true); |
If you need to modify the frame you can. Since we extend JFrame we get all the methods of JFrame. There is one called setSize(int width, int height) for instance, to change the size.
import javax.swing.*;
import java.awt.*;

public class MyJPanel extends JPanel
{
   public void paintComponent(Graphics g)
   {
      super.paintComponent(g);
      Graphics2D g2 = (Graphics2D)g;
      g2.setColor(Color.red);
      g2.drawString("Just like in the applets.", 20, 20);
      g2.fillRect(20, 50, 60, 40);
   }
} |
There are two other differences between drawing on a JPanel and drawing in an Applet. It is important that you include the statement super.paintComponent(g). What does this do? From Part 1 of this resource we learned that this calls the paintComponent method from the superclass (ie. JPanel). In order to make sure everything always gets drawn properly we must always do that in paintComponent. Secondly we have the statement Graphics2D g2 = (Graphics2D)g;. The class Graphics2D extends Graphics. This means that it has all the Graphics methods. It also adds some more powerful ones. To maintain compatability with earlier versions of Java the parameter to paintComponent is still a Graphics object. We are actually passed a Graphics2D object. Recall the discussion on polymorphism in Part 1. We can assign Graphics2D to Graphics because Graphics is a superclass of Graphics2D. This is just like when we assigned a Car or a Boat to a Vehicle. We promote it to a Graphics2D object by casting with the statement:
Graphics2D g2 = (Graphics2D)g;
        java.lang.Object
          |
          +-java.awt.Component
                |
                +-java.awt.Container
                        |      |
javax.swing.JComponent -+      +-java.awt.Window
                   |                 |
javax.swing.JPanel-+                  +-java.awt.Frame
              |                            |
     MyJPanel-+                            +-javax.swing.JFrame
                                                 |
                                                 +-MyJFrame
Notice that both have common superclasses near the top of the heirarchy. Both are
Containers. This makes sense since you can put things in both panels and frames.
public class MyCombo
{
   public static void main(String[] args)
   {
      MyJFrame mjf = new MyJFrame("JPanel Demo");
      MyJPanel mjp = new MyJPanel();
      mjf.getContentPane().add(mjp);
      mjf.setVisible(true);
      mjf.setSize(170,130);
   }
}
|
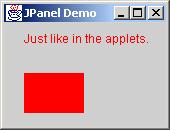
Unlike the applets we saw in Part 1, we should not simply add the MyJPanel directly to the MyJFrame. JFrames are a little more complicated than Frames. They have several layers that do different things. The ContentPane is where we need to add things. Luckily enough there is a method in JFrame (and thus also in MyJFrame) that gets a ContentPane. It is called getContentPane(). Running the above application yields:
import javax.swing.*;
import java.awt.*;

public class PanelGroup
{
   JPanel info;
   JLabel gameLabel, rollLabel, pointLabel;
   MyJFrame mjf = new MyJFrame("JLabels in JPanels");

   public PanelGroup()
   {
      info = new JPanel();
      // Create the labels
      gameLabel = new JLabel("Game #1  ");
      rollLabel = new JLabel("Roll #1  ");
      pointLabel = new JLabel("   Point: None");
      // Add them to the JPanel
      info.add(gameLabel);
      info.add(rollLabel);
      info.add(pointLabel);
      // Add the JPanel to the bottom of the MyJFrame
      mjf.getContentPane().add(info, "South");
      mjf.setSize(300,100);
      mjf.setVisible(true);

   }

   public static void main(String[] args)
   {
      PanelGroup pg = new PanelGroup();
   }

}
|
This is what you'll see: 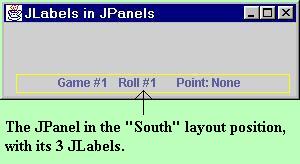
MyJFrame uses something called a BorderLayout to arrange things. There are a number of different layouts that Java can use. At times this can get frustrating. But once you get used to using layouts you'll find they are very powerful. They take care of rearranging things if you resize the frame. Your application can work on one computer with a screen size of 800 x 600 and another with a screen size of 1024 x 768 without changing any code. BorderLayout has 5 areas for you to put things on the screen. There are the 4 border areas: North, South, East and West. There is also the Center. In the previous example we used South so that our JPanel went at the bottom of the frame. You can only put one component in each of those 5 areas. That's why we needed our JPanel to group our 3 JLabels together. Without it we could only have added one label to the bottom.
For our game we will also need a JPanel to control the game. It will list how much money the user has as well as providing a button to roll some dice. We'll add this panel at the top of the screen. Here is the code we'd need to add to the previous application. Only the changes will be shown.
import javax.swing.*;
import java.awt.*;

public class PanelGroup
{
   // same as before plus these
   JPanel control;
   JLabel amountLabel;
   JButton cont;

   public PanelGroup()
   {
      // same as before plus this

      // Create the panel, label and button
      control = new JPanel();
      amountLabel = new JLabel("You have $200   ");
      cont = new JButton("Roll Dice");
      // Add to JPanel
      control.add(amountLabel);
      control.add(cont);
      // Add the JPanel to top of the MyJFrame
      mjf.getContentPane().add(control,"North");
      // These two line were moved from before
      mjf.setSize(300,150);
      mjf.setVisible(true);
   }
   // The rest as before

}
|
This is what we now have: 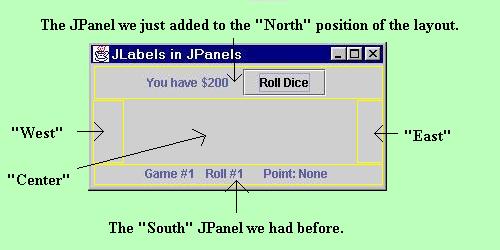
When we added things to the JPanel we just added them without specifying a compass direction. This is because by default a JPanel uses FlowLayout. This type of layout puts things on a single line as they are added. It centres by default. If there is too much to fit on one line things will flow to a second or more lines as necessary.
This looks pretty now but we can't actually play the game yet. We need to put some functionality into the button. Before we look at how to do this lets decide what game we're going to play. We're going to play craps. If you are unfamiliar with that game here are the rules:
You roll two dice. On the first roll of a game, if the sum of the dice is:
On subsequent rolls if you:
public class PanelGroup implements ActionListener
We also need to add another import statement to the top of our program:
import java.awt.event.*;We need to tell our listener to listen to our button by adding the statement:
cont.addActionListener(this);The this means that the listening code will be in this class. We put that code in by making a method called:
public void actionPerformed(ActionEvent e)This method gets called automatically whenever the button gets pressed. Now we just add the code to roll dice, play the game and update the labels. Here is the new full source code with changes bolded.
|
import javax.swing.*; import java.awt.*; import java.awt.event.*; public class PanelGroup implements ActionListener { JPanel info; JLabel gameLabel, rollLabel, pointLabel; MyJFrame mjf = new MyJFrame("JLabels in JPanels"); JPanel control; JLabel amountLabel; JButton cont; int point; int result=0; int die1, die2; int rolls = 0; int games = 1; int money = 200; boolean first = true; boolean begin = true; public PanelGroup() { info = new JPanel(); gameLabel = new JLabel("Game #1 "); rollLabel = new JLabel("Roll #1 "); pointLabel = new JLabel(" Point: None"); info.add(gameLabel); info.add(rollLabel); info.add(pointLabel); mjf.getContentPane().add(info, "South"); control = new JPanel(); amountLabel = new JLabel("You have $200 "); cont = new JButton("Roll Dice"); cont.addActionListener(this); control.add(amountLabel); control.add(cont); mjf.getContentPane().add(control,"North"); mjf.setSize(300,150); mjf.setVisible(true); } public void actionPerformed(ActionEvent e) { /** Roll the dice **/ begin = false; die1 = (int)(Math.random() * 6 + 1); die2 = (int)(Math.random() * 6 + 1); result = 0; // if result = 0 then game not over rolls++; rollLabel.setText("Roll #" + rolls + " "); /** Apply rules for first roll of a game **/ if (first) { point = die1 + die2; // get the point for this game pointLabel.setText(" Point: " + point); gameLabel.setText("Game #" + games + " "); /** Lose on first roll **/ if (point == 2 || point == 3 || point == 12) { result = 2; money -= 50; games++; /** Reinitialize for next game **/ first = true; rolls = 0; } /** Win on first roll **/ else if (point == 7 || point == 11) { result = 1; money += 50; games++; /** Reinitialize for next game **/ first = true; rolls = 0; } /** Didn't win or lose so will need more rolls **/ else first = false; } /** Subsequent rolls **/ else if ((die1 + die2) == point) // win { result = 1; money += 50; games++; /** Reinitialize for next game **/ first = true; rolls = 0; } else if ((die1 + die2) == 7) // lose { result = 2; money -= 50; games++; /** Reinitialize for next game **/ first = true; rolls = 0; } amountLabel.setText("You have $" + money + " "); } public static void main(String[] args) { PanelGroup pg = new PanelGroup(); } } |
Here is an example of playing the game: 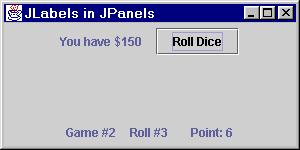
In this case we lost the first game and our now in the middle of the second game. Our point is a 6 so we want to roll a 6 before we get a 7. When we click on "Roll Dice" we'll get the fourth roll of the game. We now only have $150 since we lost the first game.
It would be nice if we could see the actual rolls of the game. That's where our MyJPanel comes into play. We can modify it to draw the dice that are rolled. Then we'll add it to the Center of our MyJFrame. Here is our new and improved MyJPanel
import javax.swing.*;
import java.awt.*;

public class MyJPanel extends JPanel
{
   Image dice[] = new Image[6], win, lose;
   int die1, die2, result;
   boolean begin = true;

   // The images are read in by our craps class and passed here for display.
   public void setImages(Image d[], Image w, Image l)
   {
      dice = d;
      win = w;
      lose = l;
   }

   // The craps class rolls the dice and figures out the outcome
   // We'll just display it here
   public void setAll(int d1, int d2, int r, boolean b)
   {
      die1 = d1;
      die2 = d2;
      result = r;
      begin = b;
   }

   // Does the drawing as in our earlier MyJPanel
   public void paintComponent(Graphics g)
   {
      super.paintComponent(g);
      Graphics2D g2 = (Graphics2D)g;
      // draw dice if they've clicked the roll button at least once
      if (!begin)
      {
         g2.drawImage(dice[die1 - 1], 20, 45, this);
         g2.drawImage(dice[die2 - 1], 160, 45, this);
      }
      else
         g2.drawString("Welcome to craps", 20, 60);
      // they won
      if (result == 1)
         g2.drawImage(win, 70,150, this);
      // they lost
      else if (result == 2)
         g2.drawImage(lose, 70,150, this);
   }
}
|
We will need to add to PanelGroup to get it to use the new MyJPanel. Here is a skeleton of where we need to add things:
public class PanelGroup implements ActionListener
{
   MyJPanel mjp;
   Image dice[], win, lose;
   // rest as before

   public PanelGroup()
   {
      // place this at the end of what we had before
      dice = new Image[6];
      dice[0] = new ImageIcon("number1.jpg").getImage();
      dice[1] = new ImageIcon("number2.jpg").getImage();
      dice[2] = new ImageIcon("number3.jpg").getImage();
      dice[3] = new ImageIcon("number4.jpg").getImage();
      dice[4] = new ImageIcon("number5.jpg").getImage();
      dice[5] = new ImageIcon("number6.jpg").getImage();
      win = new ImageIcon("win.jpg").getImage();
      lose = new ImageIcon("lose.jpg").getImage();
      mjp = new MyJPanel();
      mjp.setImages(dice, win, lose);
      mjp.setBackground(Color.white);
      mjf.getContentPane().add(mjp, "Center");
      // these two lines had to be moved down & changed
      mjf.setSize(400,400);
      mjf.setVisible(true);
   }
   public void actionPerformed(ActionEvent e)
   {
      // place this at the end of this method
      mjp.setAll(die1, die2, result, begin);
      mjp.repaint();
   }
   // the rest as before
}
|
In the constructor most of the new work is to load the graphics for the dice, a win and a loss. We also need to add the MyJPanel to the frame. The real work to display things is done in two little lines in actionPerformed. The line
mjp.setAll(die1, die2, result, begin);is how we communicate between our two classes. For MyJPanel to draw the correct things it needs to know what the new dice are. It also needs to know if there was a win or loss and if this is the first time we played. The line
mjp.repaint();tells MyJPanel to redraw its whole display. That statement causes MyJPanel's paintComponent(Graphics g) method to be called. That method draws the two appropriate dice and if necessary a handwritten win or loss message.
Here is an example of where we've just won the fifth game. 
We can make use of some other features of Swing to add some bells and whistles to this program. We're not going to go into details here though. You can look at the source. Just to give you an idea, here's a picture of the final product.

If you want to see if your brower can handle Java 2, here is a JApplet version of craps. If not, you can always try it in appletviewer if you have downloaded Java 2 from Sun.
This is the end of part 2. You can check out the References for this resource.