13.4 Button Events
In addition to creating displays, we would also like to be able to construct
GUI’s that are capable of interacting with a user. In this and the following
sections we will be examining a variety of ways that we can create
interactions with a GUI. We begin with the use of buttons.
Whenever a button is pressed, this produces an event known as an
action event. We say that the button object is the source of the event. If
some object is interested in knowing that a particular event has occurred,
that object must indicate that it wants to be a listener to occurrences of
that event. To do so, the object must register as a listener. Each object that
can produce events maintains a list of the objects that are listeners to that
particular type of event. When an event occurs, all of the objects registered
as listeners for that type of event are passed appropriate information about
the event. They can then act on this information in whatever way that we
wish them to do.
To begin to show how this works, suppose that we have constructed a
JButton object called demoButton and that we want an object of the class
ButtonResponse to act as a listener for presses of demoButton. To do so,
we must do a number of things.
- We register an object as a listener by implementing an interface. To
listen to a button, the interface that we need to implement is called
ActionListener. For our example, we note that ButtonResponse
is implementing the ActionListener interface by writing the class
header as
class ButtonResponse implements ActionListener
- We must now actually perform this implementation of the ActionListener interface. Recall that to implement an interface, we must
provide actual methods for all the methods whose headers are given
in the interface. The ActionListener interface requires the implementation
of only one method:
public void actionPerformed (ActionEvent e)
It is within this method that we would place our code for the action
we want to perform whenever demoButton is pressed.
- Finally, we need to add a ButtonResponse object to demoButton’s
list of listeners by invoking the method with header
void addActionListener (ActionListener al)
The implicit object passed to this method is demoButton and the
parameter is a ButtonResponse object (which we have made into
an ActionListener object through the use of the interface). If we
are calling the method from within the ButtonResponse class, the
ActionListener object that we pass to the method is the current
implicit ButtonResponse object. The call, therefore, would take the
form
demoButton.addActionListener(this);
The next example shows how we can incorporate these ideas into a
complete (although fairly trivial) program.
Example 1
This program creates a window containing a single button. Whenever the
button is pressed, the background colour of the button changes
randomly.import java.awt.*;
import java.awt.event.*;
import javax.swing.*;
public class ButtonColour implements ActionListener
{
JButton colourButton = new JButton("Change Colour");
public ButtonColour()
{
JFrame frame = new JFrame("Button Events");
frame.setDefaultCloseOperation(JFrame.EXIT_ON_CLOSE);
frame.setSize(300, 100);
colourButton.addActionListener(this);
frame.setLayout(new FlowLayout());
frame.add(colourButton);
frame.setVisible(true);
}
public void actionPerformed(ActionEvent e)
{
colourButton.setBackground(new Color(strength(), strength(), strength()));
}
public static int strength()
{
return (int)(256 * Math.random());
}
public static void main(String[] args)
{
new ButtonColour();
}
}
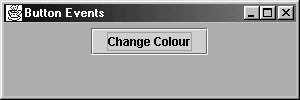
The window produced by the program should look something like this.
Each time that the button is pressed, the colour of the
button changes randomly to one of 16 777 216 (2563 = 16 777 216) possible colours.
|
|
Note: There is no call to the method actionPerformed. Instead, since the
colourButton object is registered as a listener to ActionEvents,
a call to the actionPerformed method within the ButtonColour class
is made automatically whenever the button called colourButton is
pressed.
The parameter of the method actionPerformed is an ActionEvent
object called e. This parameter, supplied automatically by Java, contains
information about the event that produced the call to actionPerformed.
Since our program is only registered as a listener for one event (the pushing
of colourButton), we do not need to use the parameter because the only
time that this method will be called is when that particular button is
pushed. If we have registered for more than one event, then we may need
to examine the parameter to determine which event caused the call to
actionPerformed. This is illustrated in the next example.
Example 2
The class TriColourFrame defines windows that have three buttons — one
for each of the component colours (red, green, or blue). An object of this
class will set the background colour of a window to one of these colours
whenever the appropriate button is pressed.
import java.awt.*;
import java.awt.event.*;
import javax.swing.*;

class TriColourFrame implements ActionListener
{
   JButton redButton = new JButton("red");
   JButton greenButton = new JButton("green");
   JButton blueButton = new JButton("blue");
   JFrame frame = new JFrame("Tricolour Buttons");

   public TriColourFrame ()
   {
      frame.setDefaultCloseOperation(JFrame.EXIT_ON_CLOSE);
      redButton.addActionListener(this);
      greenButton.addActionListener(this);
      blueButton.addActionListener(this);
      frame.setLayout(new FlowLayout());
      frame.add(redButton);
      frame.add(greenButton);
      frame.add(blueButton);
      frame.setSize(300,100);
      frame.setVisible(true);
   }

   public void actionPerformed (ActionEvent e)
   {
      if (e.getSource() == redButton)
         frame.getContentPane().setBackground(Color.red);
      else if (e.getSource() == greenButton)
         frame.getContentPane().setBackground(Color.green);
      else if (e.getSource() == blueButton)
         frame.getContentPane().setBackground(Color.blue);
      else
         frame.getContentPane().setBackground(Color.black);
   }

   public static void main(String[] args)
   {
      new TriColourFrame();
   }
}

|
|
In Example 2, the actions of the constructor in the class TriColourFrame are similar to those of the corresponding constructor in the previous
example. The only essential difference is the extra work that must be done
because there are now three buttons instead of one.
The actionPerformed method uses the value of the parameter e to
decide what action should be taken. The getSource method gives a reference to the
JButton that generated the ActionEvent (which button was clicked). The actionPerformed method then sets the frame's backgound to the appropriate colour.
The following example is similar to Example 2 except it shows how to use graphics with buttons.
Example 3
This example will draw a square, rectangle or a circle depending on which button is pressed.
import java.awt.*;
import java.awt.event.*;
import javax.swing.*;

public class DrawingShapes implements ActionListener
{
   int choice = 0;
   JButton square = new JButton("Square");
   JButton rectangle = new JButton("Rectangle");
   JButton circle = new JButton("Circle");
   Drawing draw = new Drawing();

   public DrawingShapes()
   {
      JFrame frame = new JFrame("Draw Shapes");
      frame.setDefaultCloseOperation(JFrame.EXIT_ON_CLOSE);
      square.addActionListener(this);
      rectangle.addActionListener(this);
      circle.addActionListener(this);
      JPanel panel = new JPanel();
      panel.add(square);
      panel.add(rectangle);
      panel.add(circle);
      frame.add(panel, "North");
      frame.add(draw);
      frame.setSize(500,500);
      frame.setVisible(true);
   }

   public void actionPerformed(ActionEvent e)
   {
      if (e.getSource() == square)
         choice = 1;
      else if (e.getSource() == rectangle)
         choice = 2;
      else
         choice = 3;
      draw.repaint();
   }

   class Drawing extends JComponent
   {
      public void paint(Graphics g)
      {
         g.setColor(Color.red);
         if (choice == 1)
            g.fillRect(100,80,300,300);
         else if (choice == 2)
            g.fillRect(50,200,350,100);
         else if (choice == 3)
            g.fillOval(150,100,200,200);
      }
   }

   public static void main(String[] args)
   {
      new DrawingShapes();
   }
}
Here is what the output will look like after the circle button is pressed.

|
|
Exercise 13.4
- Write a program that uses a flow layout to display a window containing
two buttons, one labelled "On" and the other labelled "Off". If a
user presses "On", the background colour should be set to white but
if a user presses "Off", the background should be set to black.
- Modify the program of the previous question so that the labels on the
buttons are "Brighter" and "Dimmer". If a user presses "Brighter",
the background colour should be set closer to white (if it is not already
white) while pressing "Dimmer" moves the background closer to black
(if it is not already black). Have each press of a button change the
intensity by one-sixteenth of the difference between pure white and
pure black.
- Modify the code in example 3 to add two buttons labelled "Larger" and "Smaller". Clicking "Larger" will add 5 pixels to the size of the shape that is showing (it will affect any shape shown after as well). Clicking "Smaller" will subtract 5 pixels from the size.
|
|