13.3 Layout Managers
If a container has more than one component, the position and size of each
of these components can be controlled by a layout manager. Swing has a
number of different layout managers and even allows you to create your
own if you want to do so. Here, however, we will examine only three.
Before we start to examine layout managers, we need something to
arrange. An object that is simple to create and display is a button, a region
of the screen that can be "pressed" by clicking on a mouse. Java has more
than one class of button; our buttons are going to be objects constructed
from the JButton class in the package javax.swing. In this section, we
will only be creating and arranging buttons. We defer our discussion of
how to use them until the next section.
FlowLayout
The objects of Java's simplest layout manager are constructed from the
class FlowLayout in the package java.awt. With FlowLayout, components
are arranged rather like words are arranged by a word processor using a
centred alignment - from left to right, and from top to bottom, with each
row centred between the left and right sides of the container. To construct
a FlowLayout in a JFrame object called frame, we could write
frame.setLayout(new FlowLayout());
Once we have a manager for a JFrame we can add components using the
instance method add of the class JFrame. For example, to add a button
with the label "Help" to the JFrame object called frame, we could first
construct a new button by writing
JButton helpButton = new JButton("Help");
and then add it to our panel by writing
frame.add(helpButton);
In this section, because we are not doing anything with our buttons, we
have no need for button identifiers. We will, therefore, abbreviate the code
for creating and adding a button to something like
frame.add(new JButton("Help"));
Example 1
This program uses a FlowLayout manager to create and arrange five buttons in a window
import javax.swing.*;
import java.awt.*;

public class FlowDemo
{
   public FlowDemo()
   {
      JFrame frame = new JFrame("Flow Layout");
      frame.setDefaultCloseOperation(JFrame.EXIT_ON_CLOSE);
      frame.setSize(400,100);
      frame.setLayout(new FlowLayout());
      frame.add(new JButton("A"));
      frame.add(new JButton("B"));
      frame.add(new JButton("C"));
      frame.add(new JButton("D"));
      frame.add(new JButton("E"));
      frame.setVisible(true);
   }
   public static void main(String[] args)
   {
      new FlowDemo();
   }
}
|
|
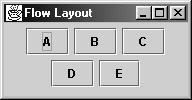
The output of the program is shown in the next illustration. Any button
that we create has a “preferred” size — enough space for the label plus
a border. A FlowLayout manager uses this information to size and position
the buttons. Here the buttons are arranged in a single row, centred at the
top of the window. The order in which we added the buttons determines
the order in which they appear in the window.

If we resize the window to make it narrower, the positions of the buttons
are changed automatically, as shown here.
BorderLayout
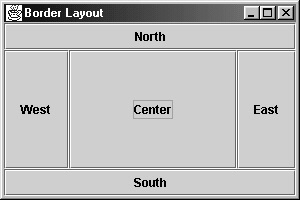
The second layout manager that we will examine is BorderLayout.
Here, the panel is divided into five regions identified by the constants NORTH,
SOUTH, EAST, WEST, and CENTER in the BorderLayout class. To add a
component, we use a version of the overloaded method add that has two
parameters: the component to be added and its position. NORTH and SOUTH
occupy the entire top and bottom of the area, EAST and WEST occupy the
remaining right and left sides, and CENTER takes whatever is left in the
interior.
(Note: BorderLayout.NORTH = "North", BorderLayout.SOUTH = "South" and so on. So many programmers use those literals instead of the named constants. The advantage of the named constants is that the compiler will flag an error is you type it incorrectly. If you use the literals you won't find out until the program tries to run. Its usually better to find the error when you are compiling rather than running a program. It is still tempting to use the convenience of the shorter to type literals)
Example 2
This program creates five buttons and places one in each of the five regions
of a BorderLayout.
import javax.swing.*;
import java.awt.*;

public class BorderDemo
{
   public BorderDemo()
   {
      JFrame frame = new JFrame("Border Layout");
      frame.setDefaultCloseOperation(JFrame.EXIT_ON_CLOSE);
      frame.setSize(300,200);
      frame.add(new JButton("Center"),BorderLayout.CENTER);
      frame.add(new JButton("West"),BorderLayout.WEST);
      frame.add(new JButton("East"),BorderLayout.EAST);
      frame.add(new JButton("North"),BorderLayout.NORTH);
      frame.add(new JButton("South"),BorderLayout.SOUTH);
      frame.setVisible(true);
   }
   public static void main(String[] args)
   {
      new BorderDemo();
   }
}
|
|
In the program, the layout style of theframe is set by the statement
frame.setLayout(new BorderLayout());
The statement is not actually needed because BorderLayout is the default
layout manager for a JFrame but inserting it does no harm and may serve
as a useful reminder to readers of the program.
The resulting window is shown in the following diagram. Notice that the
buttons, rather than being displayed at their preferred sizes, are sized to fill
each region. If we were to resize the window, the regions (and the buttons)
would expand or contract as required to keep the window filled. If the
window is made too small, then one or more of the regions may not be
visible but they will not be destroyed. If no component is added to one of
the perimeter regions, the other regions will expand to occupy that space.
GridLayout
The last layout manager that we will be looking at is called GridLayout. With this manager, we specify the number of rows and columns in
which the components are to be placed. The components are all the same
size and their dimensions are set so that the full width and height of the
container are utilized.
The constructor for the GridLayout has a parameter list of the form
(int row, int col). Normally, Java only pays attention to the row specification,
creating as many columns as necessary to fit the components into
the region. If the value of row is greater than the number of components,
blank space is left at the bottom of the region. If the value of row is zero,
the layout manager pays attention to the value of col and creates a grid
layout with the specified number of columns and the necessary number of
rows (if there are enough components for the specified dimension).
Example 3
This program displays five buttons in a grid containing three rows and two
columns.
import javax.swing.*;
import java.awt.*;

public class GridDemo
{
   public GridDemo()
   {
      JFrame frame = new JFrame("Grid Layout");
      frame.setDefaultCloseOperation(JFrame.EXIT_ON_CLOSE);
      frame.setSize(200,100);
      frame.setLayout(new GridLayout(3,2));
      frame.add(new JButton("A"));
      frame.add(new JButton("B"));
      frame.add(new JButton("C"));
      frame.add(new JButton("D"));
      frame.add(new JButton("E"));
      frame.setVisible(true);
   }
   public static void main(String[] args)
   {
      new GridDemo();
   }
}
|
|
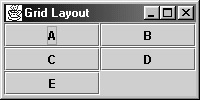
Since there are five components and we have specified that the grid should
contain three rows, the resulting window contains two columns, only the
first of which is entirely filled. The fact that we specified two columns in
the GridLayout constructor is irrelevant. If we had used (3,0) or (3,10)
rather than (3,2), we would have produced the same display.
Notice the order in which the components have been placed in the
window — row by row (sometimes called row major order).
Java has other layout managers but, even with the ones that we have
discussed, complex layouts can be produced because we can nest layouts of
any type within other layouts of any type.
Example 4
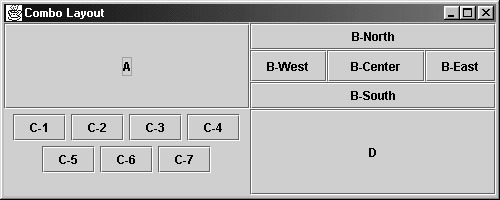
The following program illustrates a mixture of all three types of layouts
that we have examined. In it, we have embedded both a BorderLayout
and a FlowLayout within a GridLayout.
import javax.swing.*;
import java.awt.*;

public class ComboDemo
{
   public ComboDemo()
   {
      JFrame frame = new JFrame("Combo Layout");
      frame.setDefaultCloseOperation(JFrame.EXIT_ON_CLOSE);
      frame.setSize(500,200);
      frame.setLayout(new GridLayout(2,2));
      frame.add(new JButton("A"));
      JPanel borderPane = new JPanel();
      borderPane.setLayout(new BorderLayout());
      borderPane.add(new JButton("B-North"),BorderLayout.NORTH);
      borderPane.add(new JButton("B-Center"),BorderLayout.CENTER);
      borderPane.add(new JButton("B-West"),BorderLayout.WEST);
      borderPane.add(new JButton("B-East"),BorderLayout.EAST);
      borderPane.add(new JButton("B-South"),BorderLayout.SOUTH);
      frame.add(borderPane);
      JPanel flowPane = new JPanel();
      flowPane.setLayout(new FlowLayout());
      flowPane.add(new JButton("C-1"));
      flowPane.add(new JButton("C-2"));
      flowPane.add(new JButton("C-3"));
      flowPane.add(new JButton("C-4"));
      flowPane.add(new JButton("C-5"));
      flowPane.add(new JButton("C-6"));
      flowPane.add(new JButton("C-7"));
      frame.add(flowPane);
      frame.add(new JButton("D"));
      frame.setVisible(true);
   }
   public static void main(String[] args)
   {
      new ComboDemo();
   }
}
|
|
Here is what it produces.
Of course, layout managers can place components other than buttons
on the screen. The next example combines buttons with a graphical display.
It also shows how we can control the positioning of items relative to the
current size of the window.
Example 5
The following program displays a solid blue ellipse centred in a region
between two buttons.
import javax.swing.*;
import java.awt.*;

public class BorderDemo
{
   public BorderDemo()
   {
      JFrame frame = new JFrame("Graphics & Buttons");
      frame.setDefaultCloseOperation(JFrame.EXIT_ON_CLOSE);
      frame.setSize(200,200);
      frame.add(new Drawing(),BorderLayout.CENTER);
      frame.add(new JButton("Start"),BorderLayout.NORTH);
      frame.add(new JButton("Stop"),BorderLayout.SOUTH);
      frame.setVisible(true);
   }

   class Drawing extends JComponent
   {
      public void paint (Graphics g)
      {
         g.setColor(Color.blue);
         g.fillOval(getWidth()/4,getHeight()/4,getWidth()/2,getHeight()/2);
      }
   }

   public static void main(String[] args)
   {
      new BorderDemo();
   }
}
|
|
Here is the resulting image.
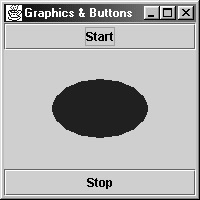
Example 5 also illustrates a new way of controlling the appearance of
an image in a region. The positioning and dimensions of the ellipse are controlled
by the methods getWidth and getHeight in the class Component.
The ellipse is centred both horizontally and vertically, with its containing
rectangle being half the width and height of the region in which it
is displayed. Whenever a user resizes the window, the paint method is
called automatically and the ellipse is redrawn, repositioned and resized
appropriately.
Exercise 13.3
- Suppose that a grid layout is to be used to display fourteen buttons.
How many rows and columns would be displayed in each case if the
call to the grid layout constructor had the form shown?
- new GridLayout(3,5)
- new GridLayout(5,4)
- new GridLayout(4,0)
- new GridLayout(0,6)
- Write a program that will produce the following image in a window
that is 140 pixels wide and 70 pixels high.

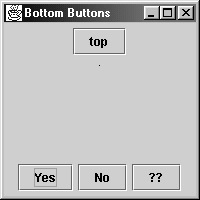
- Write a program that will produce the following display in a square
window whose sides are 200 pixels in length.
- Write a program that will display two solid red circles in a window.
The diameter of each circle should be one quarter of the smaller of
the width and height of the region. One circle should be centred
in the upper left quadrant while the other should be centred in the
lower right quadrant. Resizing the window should cause the circles
to resize appropriately.
|
|


